ESP32-CAM Smart Doorbell Part 2: Auto Light, Door Bell & SD-Card Backup
Upgrade from Part 1: automatic porch light when dark + motion, real doorbell when door opens, and photos saved to microSD when WiFi drops.
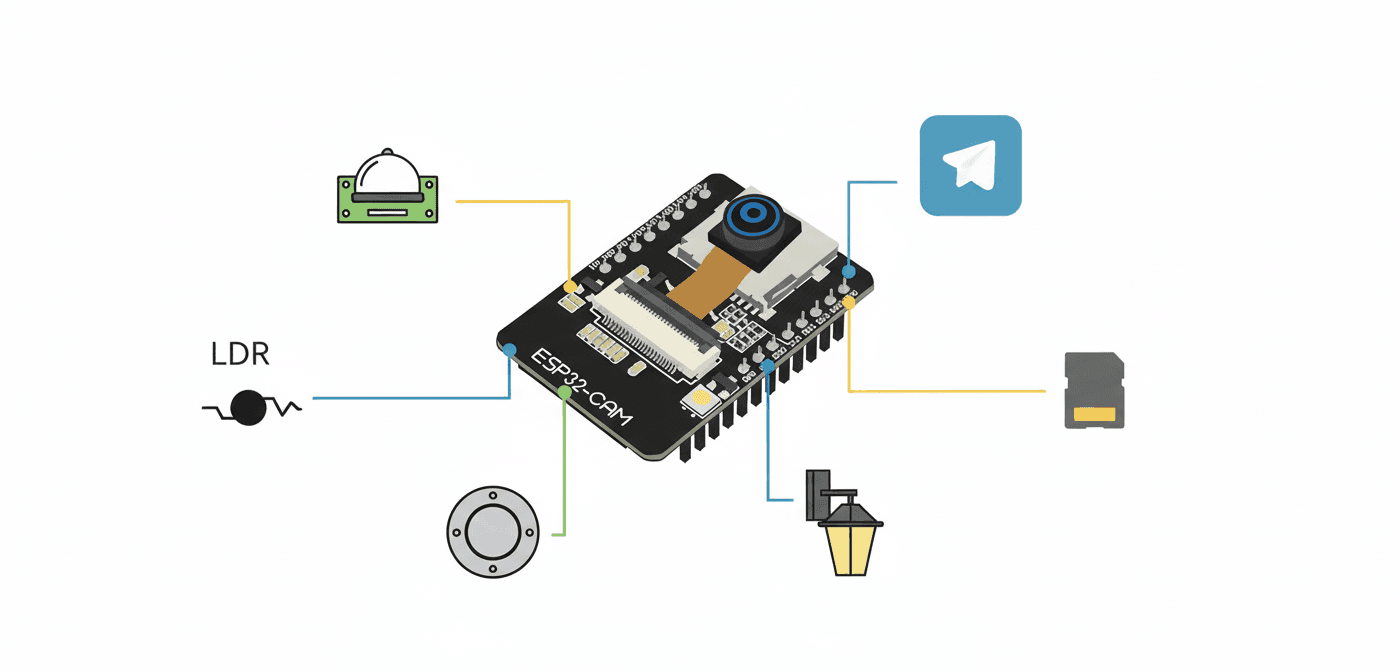
ESP32-CAM Smart Doorbell – Part 2: Auto Light, Real Bell & SD-Card Backup
You already have motion => instant Telegram photo from Part 1.
Now let’s make it actually useful in real life:
- Porch light turns on automatically when it’s dark AND someone is at the door
- Real 5 V doorbell rings for 1 second when the door actually opens (not just motion)
- If WiFi is down, the photos are saved to microSD so you never lose evidence
- All of this on the same single ESP32-CAM board (still no Arduino Uno!)
New Features Added in Part 2
| Feature | How it works |
|---|---|
| Auto porch light | Relay + LDR => light ON only when dark + motion |
| Real doorbell | Reed switch / hall sensor on door => short buzz |
| SD-card backup | Photos saved locally if Telegram fails or WiFi down |
| Telegram commands | /lighton, /lightoff, /ring, /sdlist |
Updated Parts List (added to Part 1)
| Qty | New Item | Approx. price |
|---|---|---|
| 1 | 1-channel 5 V relay module | $1 |
| 1 | Magnetic reed switch OR A3144 hall sensor + magnet | <$1 |
| 1 | MicroSD card + adapter (for ESP32-CAM) | $2–3 |
| 12 V or 5 V porch light + doorbell (whatever you already have) | – |
Wiring Diagram (everything on one board)
1ESP32-CAM (AI-Thinker)
2┌─────────────────────────────────────┐
3│ GPIO 12  ──► Relay IN (porch light)   │
4│ GPIO 14  ──► Reed switch / Hall sensor│
5│ GPIO 13  ──► PIR OUT                  │
6│ GPIO 34  ──► LDR (with 10k pull-down)│
7│ GPIO  4  ──► Flash LED                │
8│ SD pins  ──► MicroSD card adapter     │
9└─────────────────────────────────────┘
10
11Relay:
12VCC => 5V   GND => GND   IN => GPIO12
13
14Reed switch (normally open):
15One leg => GPIO14, other leg => 3.3V + 10k pull-down to GND
16(or use internal pull-down in code)
17
18MicroSD adapter:
19CS   => GPIO5
20SCK  => GPIO18
21MOSI => GPIO23
22MISO => GPIO19
Esp32 Cam Auto Light, Door Bell & SD-Card Backup Full Code
You can download the full code using the download button to your right (or just below the blog post). Let's break down how this code works step by step.
Global Variables and Pin Definitions
This section builds on Part 1 by adding new hardware pins and features. The RELAY_PIN (GPIO 12) controls the porch light relay, while DOOR_PIN (GPIO 14) monitors the reed switch or hall sensor on the door. We've also added SD_CS (GPIO 5) for the microSD card interface.
The new global variables include lightManualOverride to track if you've manually turned the light on via Telegram (preventing auto-off), doorOpened for debouncing the door sensor, and sdOK to remember if SD card initialization succeeded. The TRIGGER_INTERVAL is increased to 12 seconds to reduce photo spam when multiple people arrive together.
1#include <WiFi.h>
2#include <WiFiClientSecure.h>
3#include <UniversalTelegramBot.h>
4#include <ArduinoJson.h>
5#include <WiFiManager.h>
6#include <SD.h>
7#include <SPI.h>
8#include "esp_camera.h"
9
10//  Pin Definitions
11#define PIR_PIN        13
12#define LDR_PIN        34
13#define FLASH_LED_PIN   4
14#define RELAY_PIN      12   // Porch light
15#define DOOR_PIN       14   // Reed switch / hall sensor
16#define SD_CS           5
17
18//  Camera Model AI-Thinker
19#define PWDN_GPIO_NUM     32
20#define RESET_GPIO_NUM    -1
21#define XCLK_GPIO_NUM      0
22#define SIOD_GPIO_NUM     26
23#define SIOC_GPIO_NUM     27
24#define Y9_GPIO_NUM       35
25#define Y8_GPIO_NUM       34
26#define Y7_GPIO_NUM       39
27#define Y6_GPIO_NUM       36
28#define Y5_GPIO_NUM       21
29#define Y4_GPIO_NUM       19
30#define Y3_GPIO_NUM       18
31#define Y2_GPIO_NUM        5
32#define VSYNC_GPIO_NUM    25
33#define HREF_GPIO_NUM     23
34#define PCLK_GPIO_NUM     22
35
36//  Globals
37String BOT_TOKEN = "";
38String CHAT_ID   = "";
39WiFiClientSecure client;
40UniversalTelegramBot bot("", client);
41
42unsigned long lastTrigger = 0;
43const long TRIGGER_INTERVAL = 12000;  // 12 s between motion photos
44bool lightManualOverride = false;
45bool doorOpened = false;
46
47File photoFile;
48bool sdOK = false;
Camera and SD Card Initialization
The initCamera() function is identical to Part 1 - it configures the OV2640 camera module with all the AI-Thinker pin mappings. The PSRAM check determines if we can use high-resolution UXGA (1600x1200) or need to drop to SVGA (800x600).
The new initSD() function initializes the microSD card using SPI communication. It first calls SD.begin(SD_CS) to mount the filesystem, then checks the card type to ensure a card is actually inserted. This is critical because SD.begin() can return true even without a card present. If initialization succeeds, we set the global sdOK flag so other functions know SD backup is available. If it fails, the doorbell still works but won't have offline backup capability.
1void initCamera() {
2  camera_config_t config;
3  // (same as Part 1 – omitted for brevity)
4  config.ledc_channel = LEDC_CHANNEL_0;
5  config.ledc_timer   = LEDC_TIMER_0;
6  config.pin_d0 = Y2_GPIO_NUM;
7  config.pin_d1 = Y3_GPIO_NUM;
8  in config.pin_d2 = Y4_GPIO_NUM;
9  config.pin_d3 = Y5_GPIO_NUM;
10  config.pin_d4 = Y6_GPIO_NUM;
11  config.pin_d5 = Y7_GPIO_NUM;
12  config.pin_d6 = Y8_GPIO_NUM;
13  config.pin_d7 = Y9_GPIO_NUM;
14  config.pin_xclk = XCLK_GPIO_NUM;
15  config.pin_pclk = PCLK_GPIO_NUM;
16  config.pin_vsync = VSYNC_GPIO_NUM;
17  config.pin_href = HREF_GPIO_NUM;
18  config.pin_sscb_sda = SIOD_GPIO_NUM;
19  config.pin_sscb_scl = SIOC_GPIO_NUM;
20  config.pin_pwdn = PWDN_GPIO_NUM;
21  config.pin_reset = RESET_GPIO_NUM;
22  config.xclk_freq_hz = 20000000;
23  config.pixel_format = PIXFORMAT_JPEG;
24
25  if (psramFound()) {
26    config.frame_size = FRAMESIZE_UXGA;
27    config.jpeg_quality = 10;
28    config.fb_count = 2;
29  } else {
30    config.frame_size = FRAMESIZE_SVGA;
31    config.jpeg_quality = 12;
32    config.fb_count = 1;
33  }
34
35  esp_err_t err = esp_camera_init(&config);
36  if (err != ESP_OK) {
37    Serial.printf("Camera init failed 0x%x\n", err);
38    ESP.restart();
39  }
40}
Photo Capture and SD Backup Functions
The takePhoto() function is refactored from Part 1 to be more modular - it just captures and returns the framebuffer without sending it anywhere. This allows us to reuse the same capture code for both Telegram and SD storage.
The savePhotoToSD() function is your backup plan when WiFi dies. It creates a unique filename using millis() (milliseconds since boot), opens a file on the SD card, writes the raw JPEG buffer, and closes it. The filename format pic_123456.jpg makes it easy to identify when photos were taken. After saving, it sends a Telegram message (if WiFi comes back) informing you that a photo was backed up locally. This is crucial for security - you never lose evidence of who was at your door, even during internet outages.
1
2//  Photo Capture
3bool initSD() {
4  if (!SD.begin(SD_CS)) {
5    Serial.println("SD Card Mount Failed");
6    return false;
7  }
8  uint8_t cardType = SD.cardType();
9  if (cardType == CARD_NONE) {
10    Serial.println("No SD card attached");
11    return false;
12  }
13  Serial.println("SD Card initialized");
14  return true;
15}
16
17camera_fb_t *takePhoto() {
18  digitalWrite(FLASH_LED_PIN, HIGH);
19  delay(100);
20  camera_fb_t *fb = esp_camera_fb_get();
21  digitalWrite(FLASH_LED_PIN, LOW);
22  return fb;
23}
24
25
26void savePhotoToSD(camera_fb_t *fb) {
27  String path = "/pic_" + String(millis()) + ".jpg";
28  photoFile = SD.open(path, FILE_WRITE);
29  if (photoFile) {
30    photoFile.write(fb->buf, fb->len);
31    photoFile.close();
32    Serial.println("Saved to " + path);
33    bot.sendMessage(CHAT_ID, "WiFi down – photo saved to SD: " + path, "");
34  }
35}
Telegram Photo Sending with Fallback
This is where the magic happens. The sendPhotoTelegram() function first captures a photo using takePhoto(), then attempts to send it via bot.sendPhotoByBinary(). The key improvement from Part 1 is the error handling: if the Telegram send fails (returns false), we immediately save to SD card as a backup.
This covers multiple failure scenarios: WiFi disconnected, Telegram API down, router issues, or ISP problems. The user gets notified (when WiFi returns) that photos were saved locally, so they can retrieve them later by removing the SD card or using the /sdlist command. Always call esp_camera_fb_return(fb) at the end to prevent memory leaks - this is critical for long-term stability.
1void sendPhotoTelegram() {
2  camera_fb_t *fb = takePhoto();
3  if (!fb) {
4    bot.sendMessage(CHAT_ID, "Camera capture failed", "");
5    return;
6  }
7
8  bool ok = bot.sendPhotoByBinary(CHAT_ID, "photo.jpg", fb->len, fb->buf,
9                                  "image/jpeg", true);
10
11  if (!ok) {
12    Serial.println("Telegram failed – saving to SD");
13    savePhotoToSD(fb);
14  }
15  esp_camera_fb_return(fb);
16}
Enhanced Telegram Command Handler
The command handler now includes four new commands on top of Part 1's features. The /lighton and /lightoff commands control the relay directly and set the lightManualOverride flag - this prevents the auto-off timer from killing your manually-enabled light.
The /ring command is clever: it pulses the relay HIGH for 1 second then back LOW, creating a doorbell effect. You can use this to remotely ring your own doorbell (useful for pranks or testing). The /sdlist command opens the SD card root directory, iterates through all files, and sends you a list with filenames and sizes. This lets you check what's been backed up without physically accessing the board.
Notice the security check at the top - if chat_id doesn't match your CHAT_ID, the command is rejected. This prevents strangers from controlling your doorbell if they somehow get your bot's username.
1
2//  Telegram Commands
3
4void handleNewMessages(int numNewMessages) {
5  for (int i = 0; i < numNewMessages; i++) {
6    String chat_id = bot.messages[i].chat_id;
7    String text = bot.messages[i].text;
8
9    if (chat_id != CHAT_ID) {
10      bot.sendMessage(chat_id, "Unauthorized", "");
11      continue;
12    }
13
14    if (text == "/lighton")  { digitalWrite(RELAY_PIN, HIGH); lightManualOverride = true; bot.sendMessage(chat_id, "Light ON (manual)", ""); }
15    if (text == "/lightoff") { digitalWrite(RELAY_PIN, LOW);  lightManualOverride = false; bot.sendMessage(chat_id, "Light OFF", ""); }
16    if (text == "/ring")     { digitalWrite(RELAY_PIN, HIGH); delay(1000); digitalWrite(RELAY_PIN, LOW); bot.sendMessage(chat_id, "Ding-dong!", ""); }
17    if (text == "/photo")    { bot.sendMessage(chat_id, "Snapping...", ""); sendPhotoTelegram(); }
18    if (text == "/sdlist") {
19      File root = SD.open("/");
20      String list = "SD card files:\n";
21      File file = root.openNextFile();
22      while (file) {
23        list += String(file.name()) + " (" + file.size() + " bytes)\n";
24        file = root.openNextFile();
25      }
26      bot.sendMessage(chat_id, list, "");
27    }
28  }
29}
Setup Function
The setup adds two new pin configurations: RELAY_PIN as OUTPUT (starts LOW so the light is off at boot) and DOOR_PIN with INPUT_PULLDOWN (pulls to ground when door is closed, goes HIGH when magnet moves away). The internal pull-down saves us from adding an external resistor.
After initializing the camera, we call initSD() and store the result in sdOK. Even if SD init fails, the system continues - we just won't have backup capability. The WiFiManager configuration is identical to Part 1, creating the captive portal for initial setup. The bot initialization happens after WiFi connects, ensuring we can immediately start receiving commands.
1//  Setup
2
3void setup() {
4  Serial.begin(115200);
5  WRITE_PERI_REG(RTC_CNTL_BROWN_OUT_REG, 0);
6
7  pinMode(FLASH_LED_PIN, OUTPUT);
8  pinMode(PIR_PIN, INPUT);
9  pinMode(RELAY_PIN, OUTPUT);
10  pinMode(DOOR_PIN, INPUT_PULLDOWN);
11
12  digitalWrite(RELAY_PIN, LOW);
13
14  initCamera();
15  sdOK = initSD();
16
17  WiFiManager wm;
18  WiFiManagerParameter p_token("token", "Telegram Bot Token", "", 50);
19  WiFiManagerParameter p_chat("chat", "Your Chat ID", "", 20);
20  wm.addParameter(&p_token);
21  wm.addParameter(&p_chat);
22  wm.setSaveConfigCallback([&]() {
23    BOT_TOKEN = p_token.getValue();
24    CHAT_ID   = p_chat.getValue();
25    bot = UniversalTelegramBot(BOT_TOKEN, client);
26  });
27
28  if (!wm.autoConnect("Doorbell-Setup")) ESP.restart();
29
30  client.setInsecure();
31  bot = UniversalTelegramBot(BOT_TOKEN, client);
32
33  Serial.println("Ready! IP: " + WiFi.localIP().toString());
34}
Main Loop - Three Simultaneous Tasks
The loop() now juggles three independent tasks that run in parallel without blocking each other.
Task 1 - Motion Detection with Auto Light: When PIR goes HIGH and the cooldown expires, we capture and send a photo. Then we read the LDR value - if it's below 800 (indicating darkness) and manual override isn't active, we turn on the relay for 60 seconds. This gives visitors time to find the doorbell or keys without keeping the light on all night. The threshold of 800 works for most LDRs but you may need to adjust it based on your sensor and ambient light levels.
Task 2 - Door Open Detection: The door sensor triggers when digitalRead(DOOR_PIN) goes HIGH (magnet moved away from reed switch). We use the doorOpened flag for debouncing - it ensures we only ring once per door opening, not continuously while the door is open. When triggered, the relay pulses for 1 second (ring!) and sends a Telegram alert. When the door closes (pin LOW), we reset doorOpened to ready the system for the next opening.
Task 3 - Telegram Polling: Every 1.2 seconds, we check for new Telegram commands. This is slightly slower than Part 1's 1-second interval to reduce WiFi traffic when handling the new relay and door features. The polling is non-blocking - while waiting for the next check, the PIR and door sensors continue monitoring in real-time.
This multi-tasking approach means your doorbell responds instantly to motion or door events while still processing Telegram commands smoothly.
1//  Main Loop
2void loop() {
3  // 1. Motion detection
4  if (digitalRead(PIR_PIN) == HIGH && (millis() - lastTrigger > TRIGGER_INTERVAL)) {
5    lastTrigger = millis();
6    sendPhotoTelegram();
7
8    // Auto light when dark + motion
9    int lightLevel = analogRead(LDR_PIN);
10    if (lightLevel < 800 && !lightManualOverride) {  // tweak 800 for your room
11      digitalWrite(RELAY_PIN, HIGH);
12      delay(60000);  // keep light on 60 s
13      digitalWrite(RELAY_PIN, LOW);
14    }
15  }
16
17  // 2. Door actually opened => ring bell
18  if (digitalRead(DOOR_PIN) == HIGH && !doorOpened) {
19    doorOpened = true;
20    digitalWrite(RELAY_PIN, HIGH);
21    delay(1000);
22    digitalWrite(RELAY_PIN, LOW);
23    bot.sendMessage(CHAT_ID, "Door opened – bell rang!", "");
24  }
25  if (digitalRead(DOOR_PIN) == LOW) doorOpened = false;
26
27  // 3. Telegram polling
28  static unsigned long lastBot = 0;
29  if (millis() - lastBot > 1200) {
30    int num = bot.getUpdates(bot.last_message_received + 1);
31    if (num) handleNewMessages(num);
32    lastBot = millis();
33  }
34}
What You Get Now?
- Someone rings/moves => photo in Telegram + light turns on if dark
- Door actually opens => real doorbell buzz + Telegram alert
- WiFi drops => photos safely saved to SD card
- Full manual control from Telegram anywhere in the world
Next: Part 3 (coming soon)
- Battery backup with auto-charging
- Watchdog + auto-reboot on crash
- OTA updates
- Home Assistant / MQTT integration
- Two PIRs + health monitoring
Drop a comment if you built it – I’d love to see your version!
Happy hacking!
Previous Post
ESP32-CAM Smart Doorbell with Instant Telegram Photos (Part 1)
Next Post
ESP32-CAM Smart Doorbell Part 3: With Rock-Solid Reliability
If the article helped you in some way, consider giving it a like. This will mean a lot to me. You can download the code related to the post using the download button below.
If you see any bug, have a question for me, or would like to provide feedback, please drop a comment below.