The Anatomy of 3D Print Failures: Causes and Fixes
A comprehensive guide to common 3D printing failures. Learn how to identify, diagnose, and fix issues like spaghetti, stringing, zits, and warping.

The Reality of 3D Printing
Every 3D printing enthusiast knows the feeling. You start a long print, watch the first few layers go down perfectly, and go to bed. The next morning, you wake up expecting a finished part. Instead, you find a tangled, plastic disaster on your build plate.
Failures are an inevitable part of the 3D printing process. They are frustrating, but they are also learning opportunities. Every failed print leaves clues behind. If you learn to read these clues, you can tune your machine to prevent them from happening again.
Let us look at the most common types of 3D print failures. We will explore what causes them and how you can fix them. We will also look at which of these failures are the best candidates for automated AI detection.
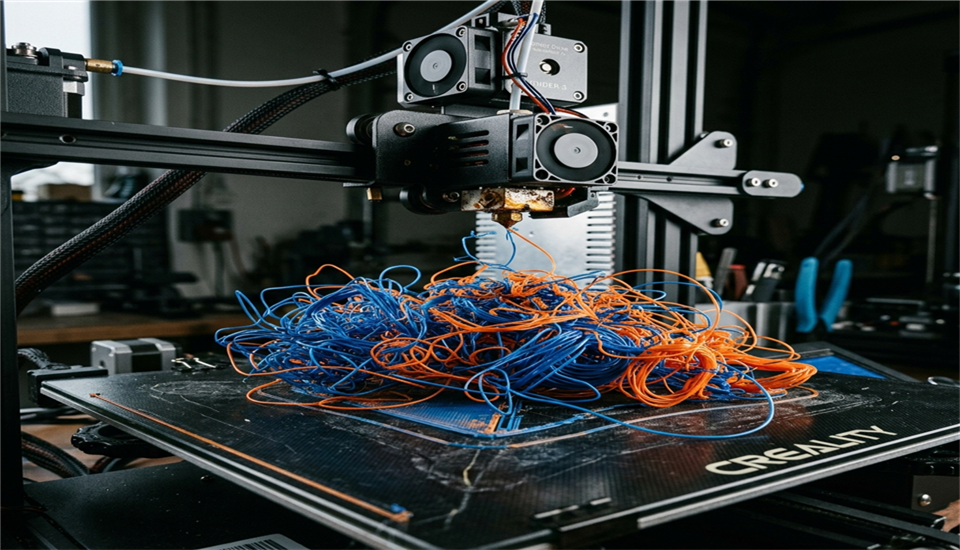
1. The Spaghetti Monster (Total Detachment)
This is the most notorious of all 3D printing failures. You come back to your printer and find a massive nest of extruded filament. It looks like a plate of plastic spaghetti.
This happens when the print loses adhesion to the build plate. The printer continues moving and extruding material in mid-air. Since the plastic has nothing to stick to, it just curls and tangles around the nozzle and the build area.
Causes
- Poor bed adhesion due to incorrect leveling.
- A dirty or greasy build plate.
- Printing without a brim or raft for models with small footprints.
- The nozzle hitting a warped part of the print and knocking it loose.
The Fix
The best defense against spaghetti is a perfect first layer. Clean your build plate with isopropyl alcohol before every print. Tram your bed correctly. If your model has a small contact area with the bed, strongly consider using a brim.
[!CAUTION] Why this matters for AI: Spaghetti is a critical failure. Unlike minor cosmetic issues, a spaghetti failure ruins the print entirely and wastes all subsequent filament. It can also create a fire hazard if the plastic clumps around the hotend heater block. This makes it the highest priority target for an automated AI detection system.
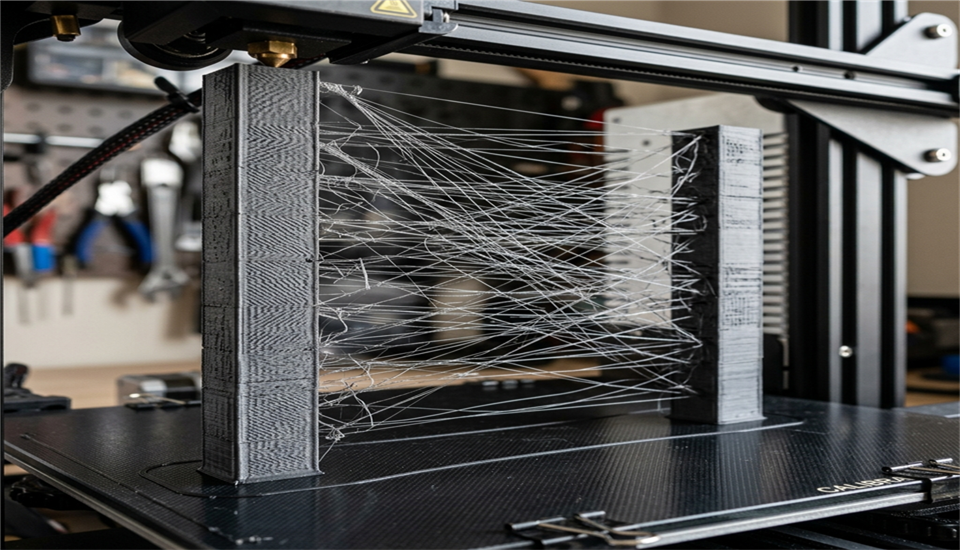
2. Stringing (The Spiderweb Effect)
Stringing occurs when thin, wispy strings of plastic are left behind as the print head moves between different parts of the model. The model looks like it is covered in spiderwebs.
The printer nozzle oozes a little bit of plastic while it is traveling over open space. This plastic stretches out into tiny hairs.
Causes
- Incorrect retraction settings. The printer is not pulling the filament back far enough or fast enough before a travel move.
- Printing temperature is too high. This makes the plastic less viscous and more likely to drip.
- Travel speeds are too slow, giving the plastic more time to ooze.
The Fix
Start by tuning your retraction distance and retraction speed in your slicer. If the issue persists, try lowering your hotend temperature by 5 degrees at a time. Increasing travel speeds can also help snap the filament cleanly.
[!NOTE] Why this matters for AI: Stringing is mostly a cosmetic issue. You can often clean it up with a heat gun or a lighter after the print finishes. For an AI detection model, stringing is a helpful warning sign, but it usually does not require an emergency stop.
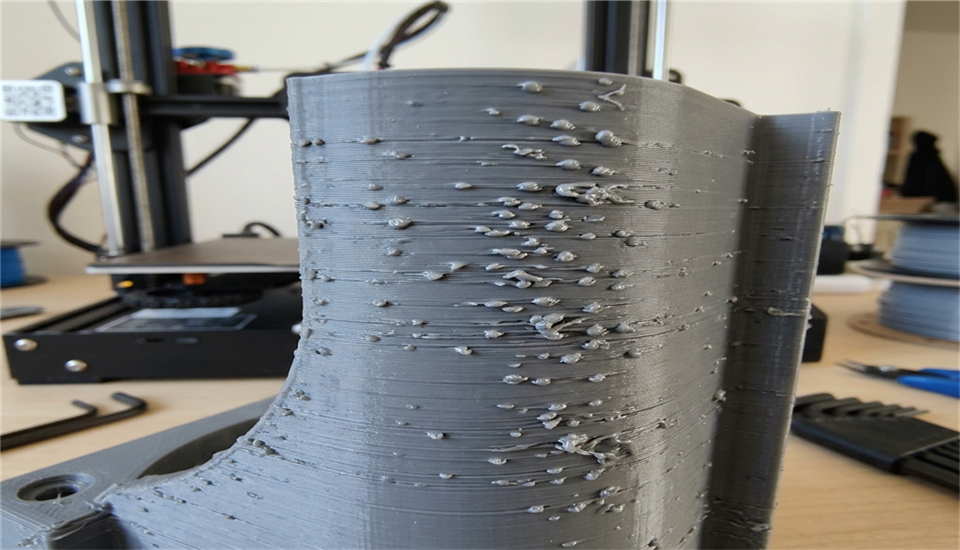
3. Zits and Blobs
Sometimes your print will have small pimples or blobs on the outer surface. These are commonly referred to as zits. They disrupt the smooth finish of the walls and can interfere with mechanical tolerances.
Causes
- The Z-seam. Every time a layer finishes, the printer moves up to start the next one. This pause can leave a small blob.
- Over-extrusion. Pushing slightly too much plastic can cause it to bulge out.
- Wet filament. Moisture in the filament turns to steam in the hotend, causing tiny explosions that leave gaps or blobs.
The Fix
In your slicer, play with the Z-seam alignment settings. Hiding the seam on a sharp corner makes it much less noticeable. If the blobs are random, you might need to dry your filament or calibrate your extruder's E-steps and flow rate.
[!TIP] Why this matters for AI: Detecting zits is challenging because they are very small. It pushes the limits of computer vision models and requires high-resolution camera feeds. While purely cosmetic, excessive zits indicate that calibration is drifting.
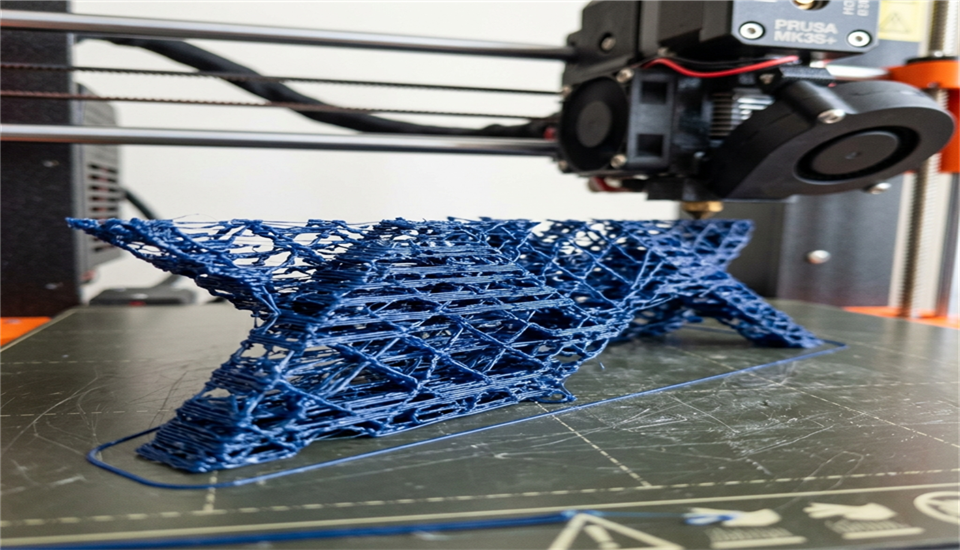
4. Warping
Warping happens when the corners or edges of your print curl up and peel away from the build plate. In severe cases, warping can cause the entire print to detach and lead to a spaghetti failure.
This is a thermal contraction issue. As the plastic cools down, it shrinks. If the upper layers cool and shrink faster than the bottom layers, they pull the edges of the print upwards.

Causes
- Poor bed adhesion.
- Drafts or uneven cooling in the room around the printer.
- Using materials prone to shrinkage, like ABS or high-temperature nylons, without an enclosure.
- The heated bed temperature being too low or cooling down during the print.
The Fix
Ensure excellent bed adhesion. Turn off the part cooling fan for the first few layers. If printing sensitive materials, use a draft shield or put the printer inside an enclosure to maintain a stable ambient temperature.
5. Layer Shifting
You check on your print and everything above a certain height is shifted to the left or right. It looks like the model was sliced horizontally and slid across itself. The print is completely ruined.
This indicates that the printer lost track of its physical location. The stepper motors skipped steps.

Causes
- Loose belts. The gear turned, but the belt slipped.
- Over-tightened belts binding the movement.
- The nozzle catching on a warped or curling piece of the print, causing the motor to skip.
- Overheating stepper motor drivers on the mainboard.
The Fix
Check the belt tension on your X and Y axes. They should be tight enough to pluck like a bass string, but not rigid. Ensure the print head moves smoothly when manually pushed. Keep an eye on warping, as a nozzle collision is a very common cause of layer shifts.
6. Under-Extrusion and Over-Extrusion
These are two sides of the same coin. Under-extrusion happens when not enough plastic is pushed out. The print looks thin, fragile, and has gaps between the lines. Over-extrusion is when too much plastic comes out. The print looks messy, blobs occur, and dimensions are inaccurate.
Causes
- Incorrect E-steps calibration.
- Incorrect flow rate multiplier in the slicer.
- A partially clogged nozzle (for under-extrusion).
- Stripped extruder gears slipping on the filament.
The Fix
Calibrate your E-steps to ensure that when you ask for 100mm of filament, exactly 100mm is fed. Calibrate your slicer's flow rate for the specific material you are using. If you have sudden under-extrusion, perform a cold pull to clear potential clogs.
Automating the Fix
Understanding these failures helps you dial in your printer mechanically. But what happens if a failure starts while you are not looking? It does not matter how well you know the fix if you do not catch the error in time.
This is where identifying failures becomes a data problem. By recognizing the visual signatures of these failures, we can teach a computer vision model to spot them.
In my post, Training a YOLOv26 Model for 3D Print Failure Detection, we have done exactly that. We trained an AI model to watch for the three most common visual defects: spaghetti, stringing, and zits.
Previous Post
Building a Real-Time 3D Print Monitoring System with YOLOv26
Next Post
LLMChat: Building a Self-Hosted ChatGPT Alternative with FastAPI
If the article helped you in some way, consider giving it a like. This will mean a lot to me. You can download the code related to the post using the download button below.
If you see any bug, have a question for me, or would like to provide feedback, please drop a comment below.